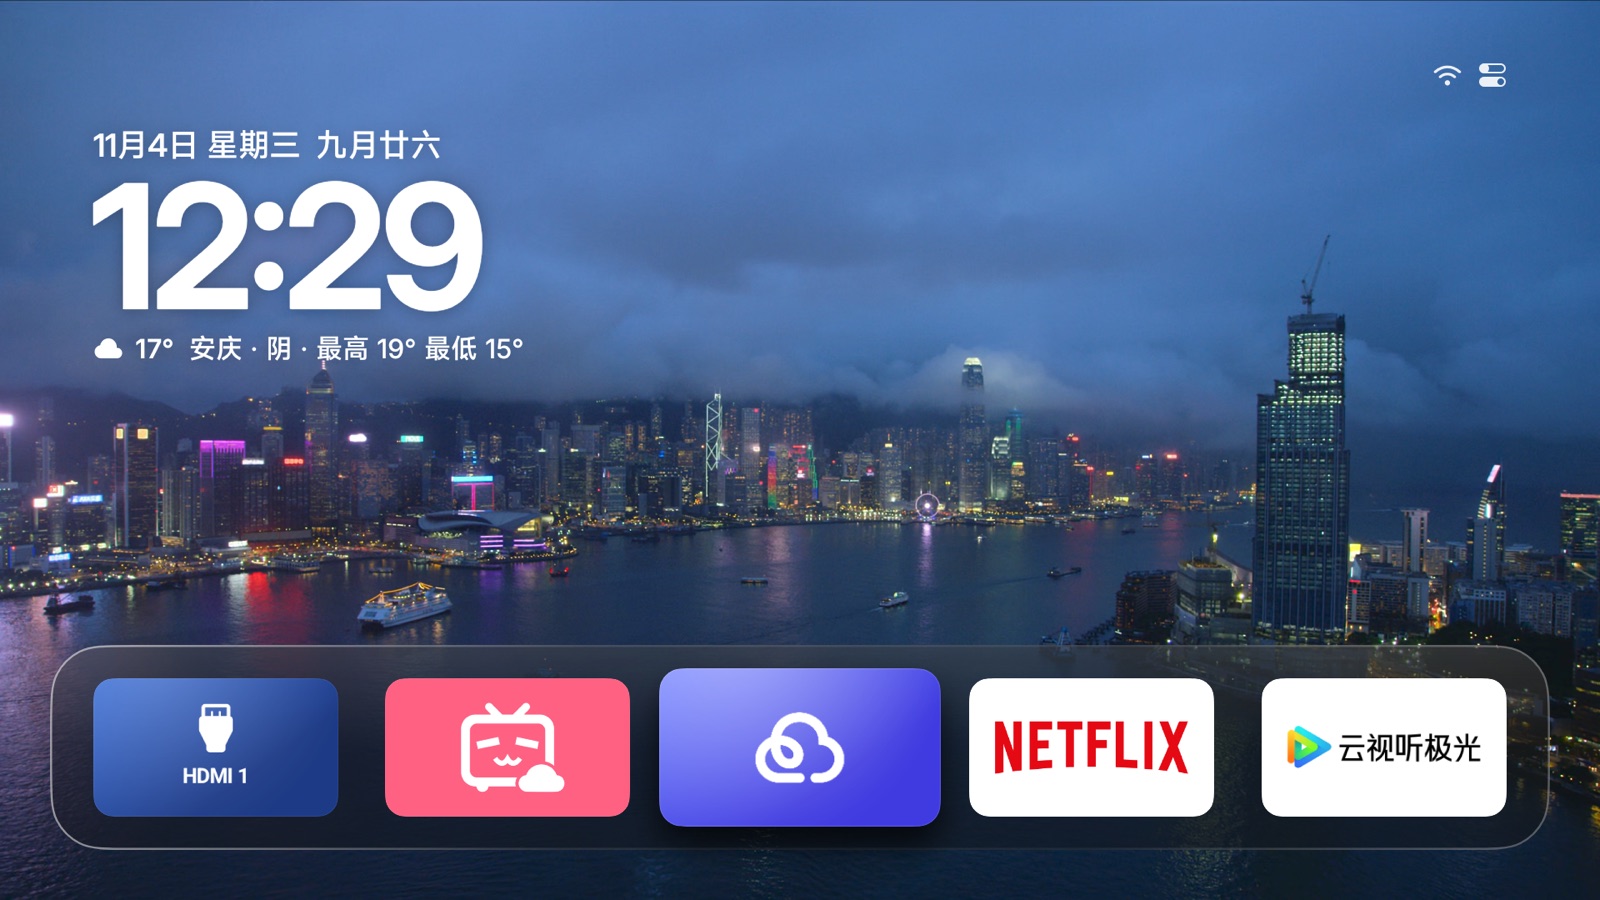
Turn on the TV and you see your wallpaper and the apps you use.
Home
As easy as Apple TV.
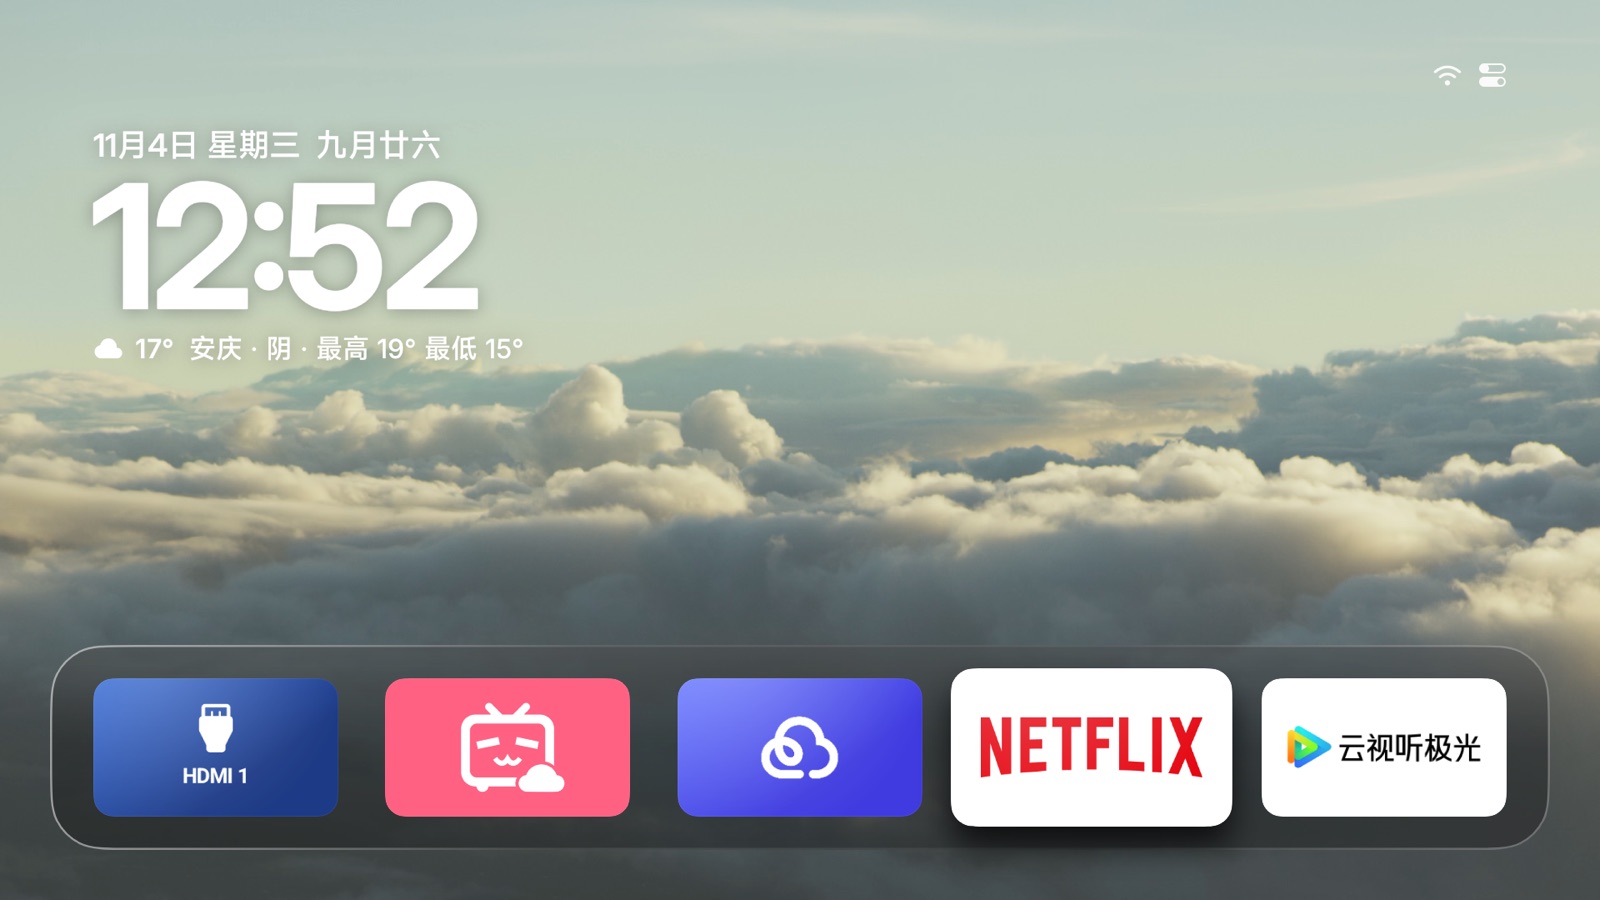
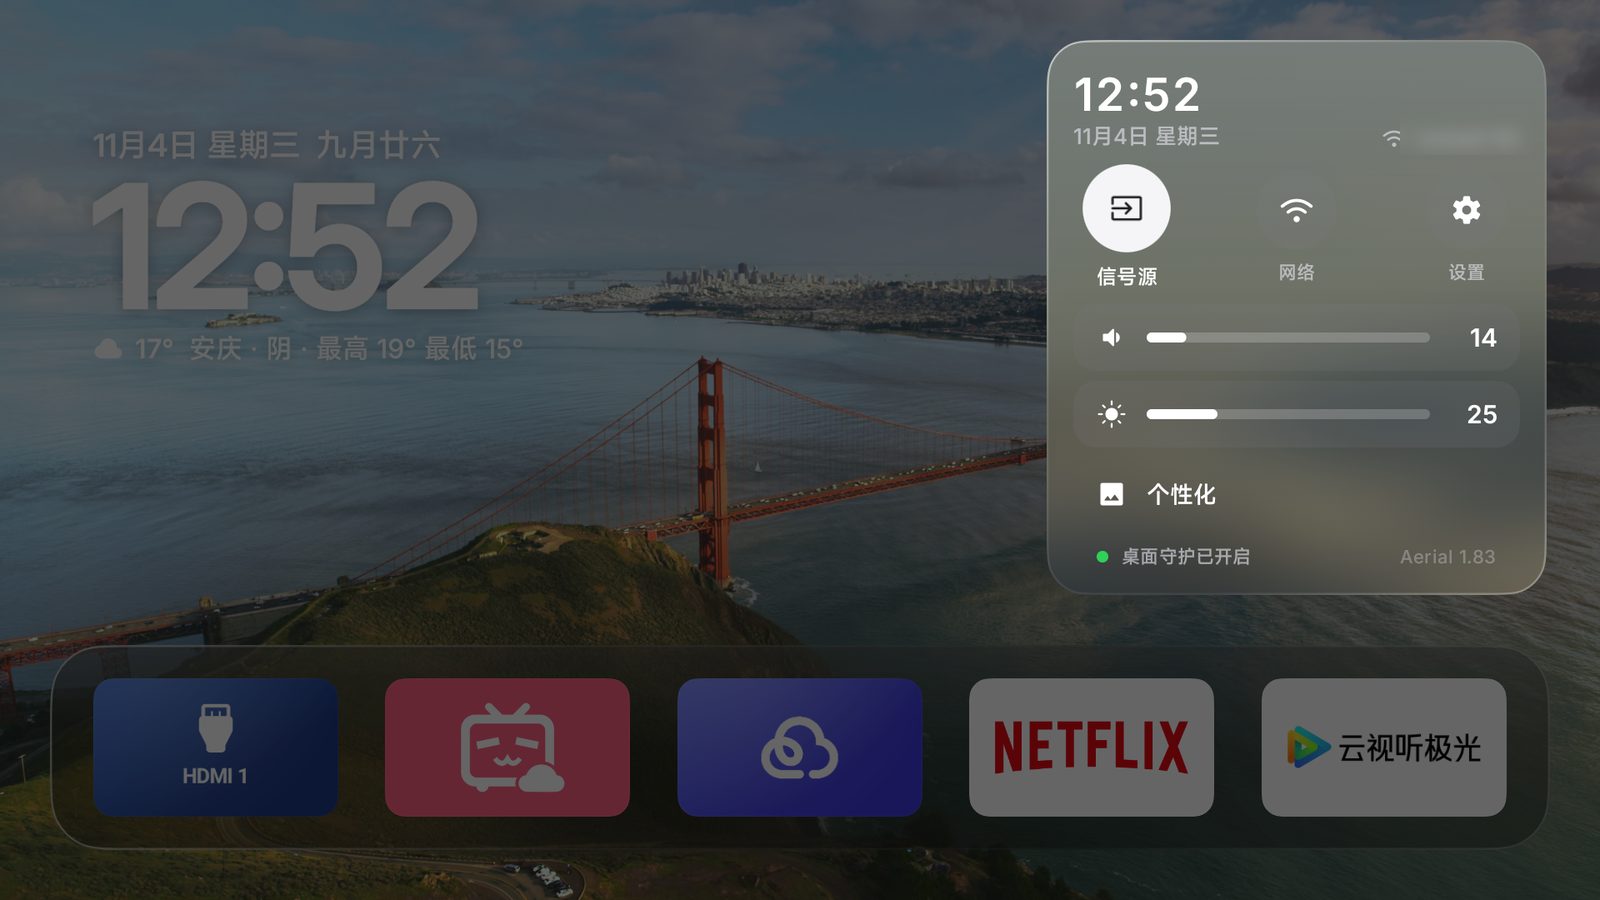
Your favorite apps sit in one row on a glass shelf. The focused one lifts gently and casts a soft shadow.
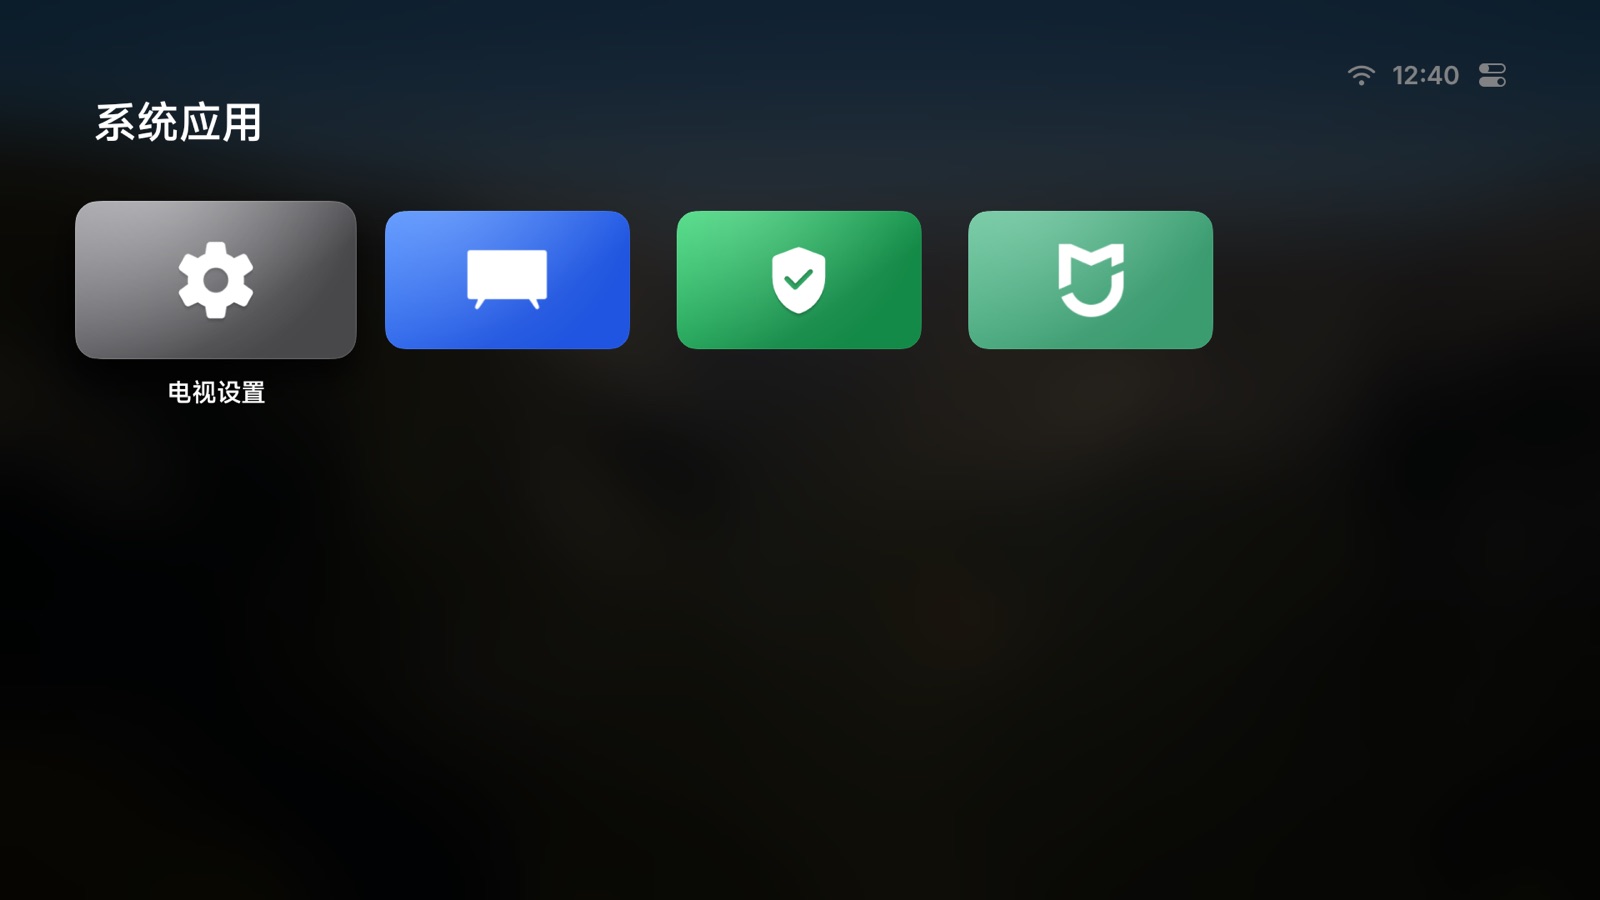
A white ring marks focus, easy to spot from the couch. Hidden system apps like Xiaomi's App Store and Mi Home show up too.
Organize
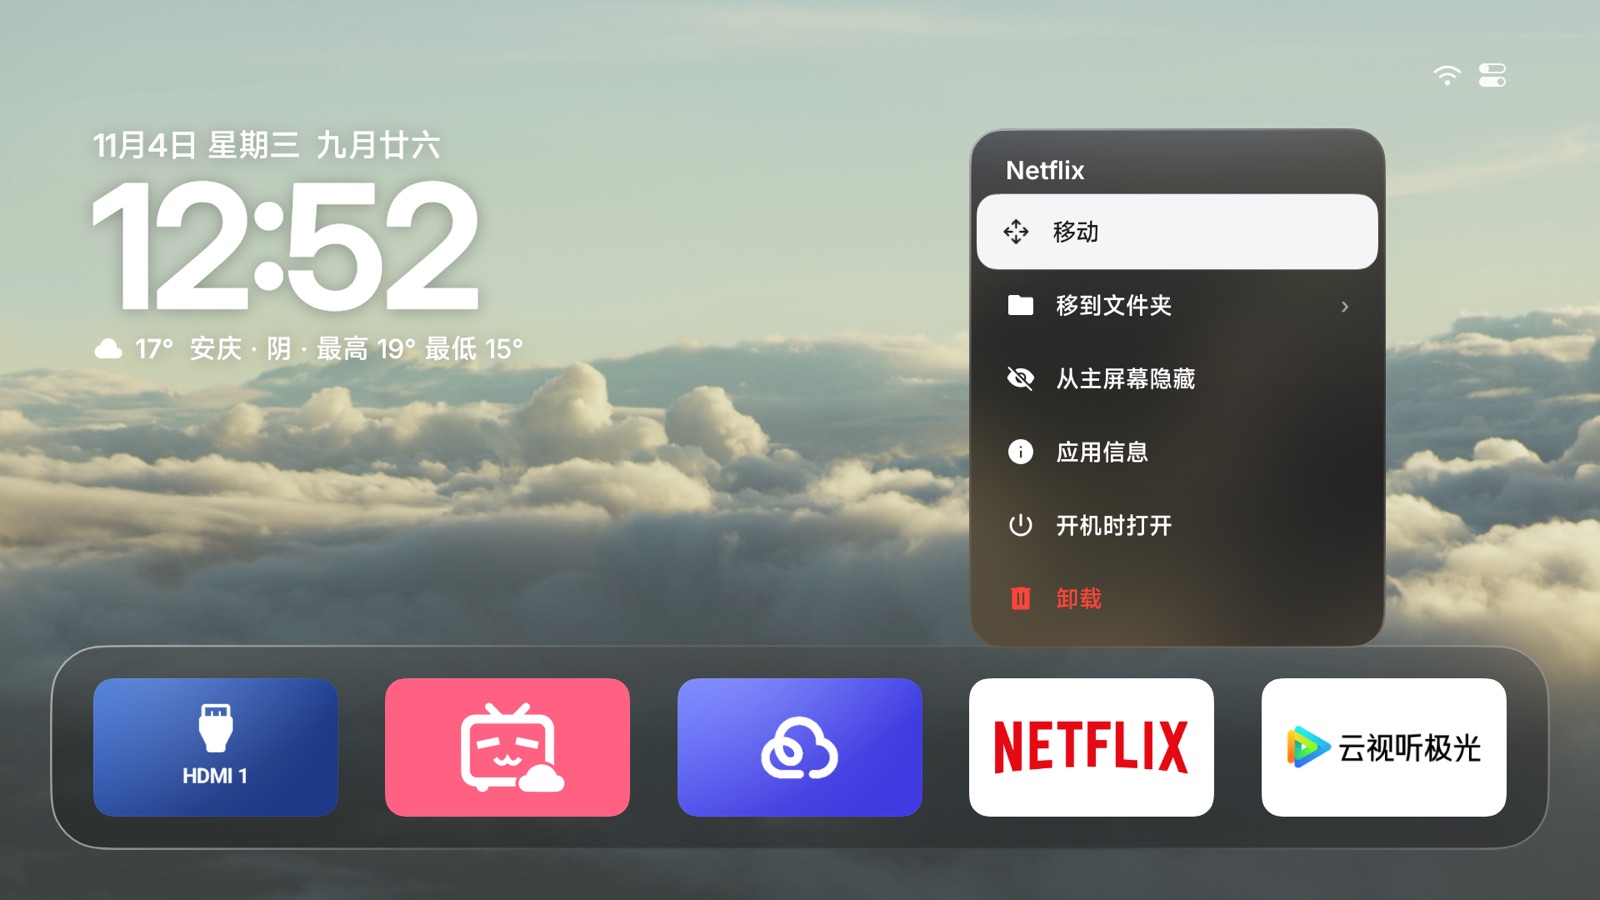
Hold OK to make it yours.
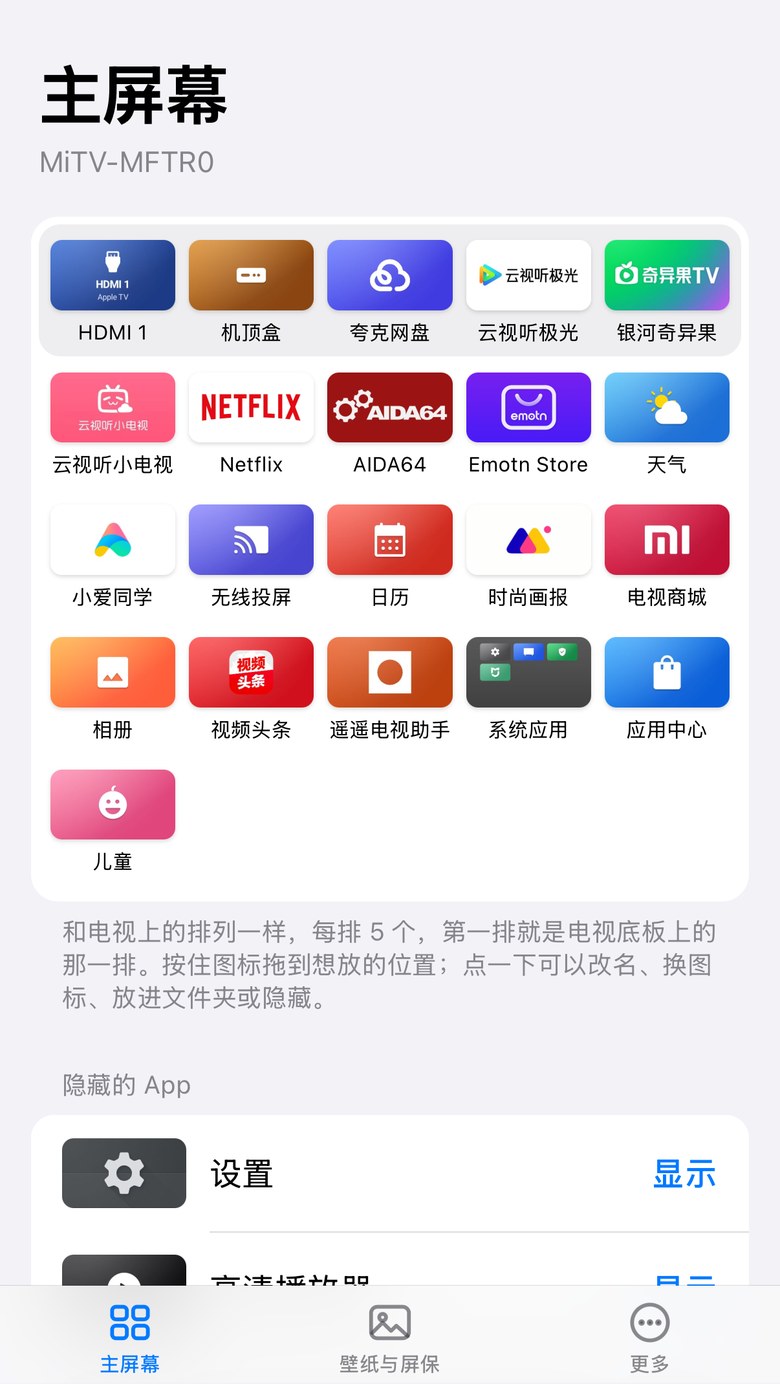
Move, put in a folder, hide, inspect or uninstall any app. Hidden apps wait in Personalize.
Choose Open When TV Turns On and the TV goes straight to that app or input when it turns on or wakes, and leaves you alone while it stays on.
Folders
Tuck the TV's own apps into a folder.
Folders sit on Home like any app, as on Apple TV. Press OK to open one.
Control Center
Everyday controls, one button away.
Inputs, network, settings, volume and brightness, all in one place. Pin an HDMI input to Home to switch in one press.
Layout
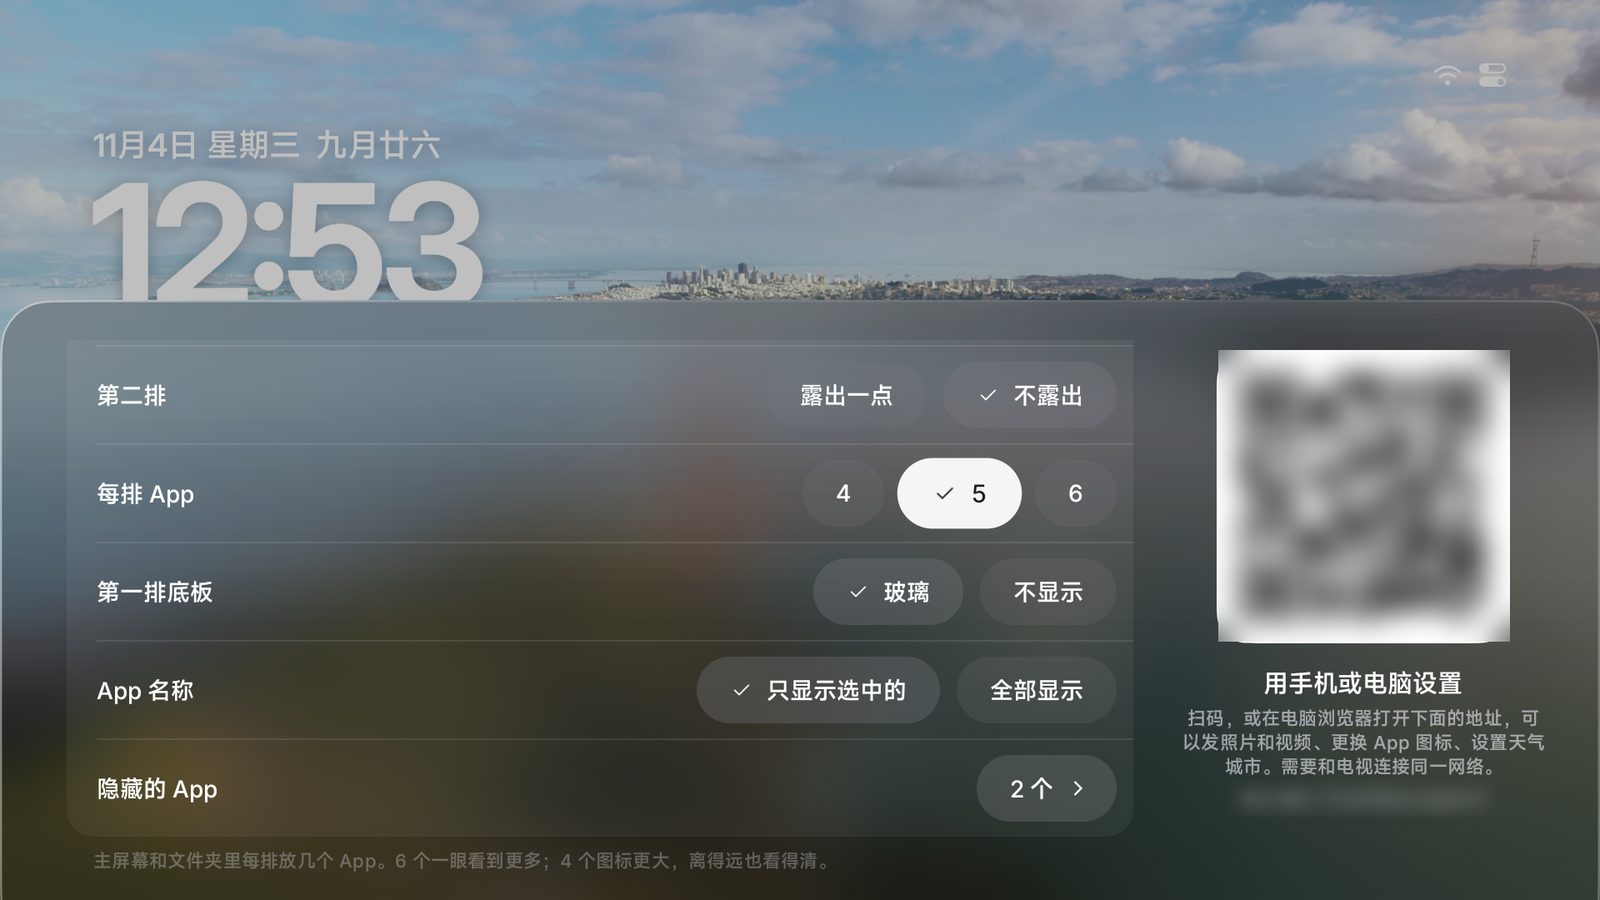
As many per row as you like.
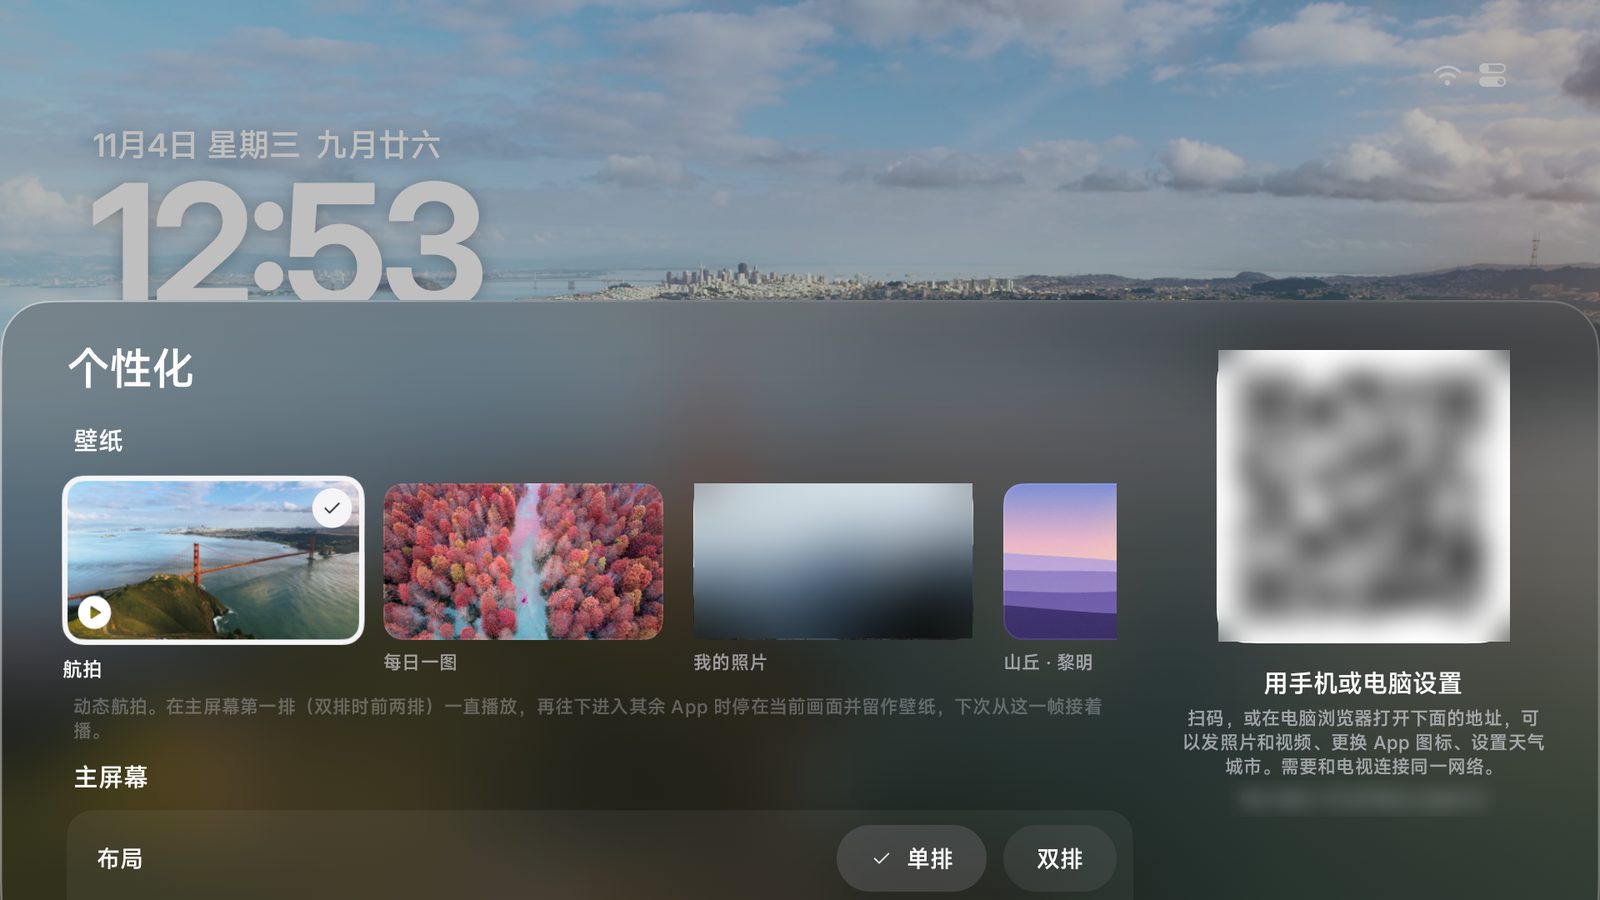
Four, five or six apps a row, one row or two, and your pick of clock size, app names and the glass shelf. Folders and the phone page follow along.
When you're not watching, enjoy the view.
114 aerial films from Apple TV, from orbit to the ocean floor, with place names.
<<<<<<< HEAD
Half Dome, Yosemite Valley
The Great Wall at Mutianyu, Beijing
=======
Longji rice terraces, Guangxi
Santa Monica Beach, Los Angeles
>>>>>>> upstream/main
Wallpaper
A view that moves, or your own photos.
The aerial wallpaper plays slowly behind your apps while you rest on Home, and stops on the frame at any key. Or pick Bing's photo of the day, fourteen Mac-style built-ins, or photos and videos from your phone.
Set up from your phone
Scan. Don't type.
Scan the code on the TV to arrange Home on your phone (drag to reorder, rename, change icons, folders, hide, add HDMI), upload photos and videos, pick a wallpaper or change the screensaver.
Home at boot. Still home after standby.
Most TVs sold in China lock you into the maker's launcher and kill other apps in standby. PlanYourTV works around both, with no root and no system apps disabled.
Owns the Home button
PlanYourTV becomes the default home screen where it can; elsewhere, Home Guard brings it back. The stock launcher is still there.
Back in half a second
Xiaomi TVs force-stop other apps in standby. Android brings PlanYourTV right back.
Survives a power cut
PlanYourTV takes over at boot. The installer gets it past TCL's startup block.
Hisense / Vidda and some Coocaa sets boot into their own home first; FFALCON MT9655 models can't be taken over yet.
Up and running in three minutes.
No root, and you can undo it any time.
1Turn on ADB debugging on the TV
Settings (设置) → About (关于) → press OK on Model (产品型号) until developer mode is on. Then Settings → Account & Security (账号与安全): turn on ADB debugging (ADB 调试) and Install unknown apps (安装未知来源的应用). The IP address is under Settings → Network → the connected network.
Settings (设置) → About (关于) → Device info (本机信息), then quickly press Up, Down, Left, Right. Turn on ADB in the More (更多) group that appears. The IP address is under Settings → Network → the connected network.
Press the Source button on the TV itself. While the source menu is open, press Left, Left, Up, Right on the remote to open the factory menu (海尔工厂菜单), then set ADB 调试开关 (ADB debugging) to on. Change nothing else. The IP address is under Settings → Network → the connected network.
Settings (设置) → System (系统) → About (关于本机) → Model (设备型号), press Up, Up, Right, Right, then OK. Then Settings → System → Developer options (开发者选项) and turn on USB debugging (USB 调试, sometimes called ADB debugging). The IP address is at the bottom of Settings → Network → the connected network.
Settings → Device Preferences → About → press Build (not Android version) 7 times, then turn on USB debugging in Developer options. The IP address is under Settings → Network → the connected network.
Some TVs cannot open ADB at all: old LeTV sets, Honor Vision and old Konka models (no version number to tap). XGIMI H3 needs a third-party tool to open ADB first.
TVs that only offer Wireless debugging (no USB/network debugging toggle) on Android 11 and later, such as Sony BRAVIA on Android 14: wireless debugging pairs first; adb connect <TV-IP>:5555 alone does not work. Open Wireless debugging → Pair device with pairing code, run adb pair <TV-IP>:<pairing-screen port> and type the 6-digit code, then adb connect <TV-IP>:<main-screen port> (the two ports differ), and install as usual. More in the by-brand guide (Chinese); to use plain <TV-IP>:5555 afterwards, run adb tcpip 5555 once connected. Some TCL firmwares (Q10M, Q10L, Crane 6 Ultra and similar) have no pairing-code entry at all; there, authorize once over a USB cable instead, as the same guide explains.
2Enter the TV's IP address
It's under Settings → Network → the connected network (at the bottom on OPPO S1). Your computer must be on the same network.
3Pick a way to install
Paste this into an agent that can run commands on your computer, such as:
Claude Code
Codex
Cursor
WorkBuddy
Trae
Phone apps and web chats (including Doubao on a phone) only tell you the steps; they can't run anything. Use a desktop build that can run commands, such as Doubao for desktop or Doubao Work, WorkBuddy, Qwen for desktop, Trae, Claude Code or Codex.
Run it in a macOS or Linux terminal; it downloads adb if you don't have it. On Windows, use an agent.
TVs that only offer Wireless debugging pair first: with a pairing-code entry, set the ADB_PAIR, ADB_CODE and ADB_CONNECT variables before running (the README shows how) and the script pairs and switches back to 5555 for you; without a pairing-code entry (TCL Q10M, Q10L, Crane 6 Ultra and similar), connect the TV once with a USB cable as in the by-brand guide (Chinese) and run adb tcpip 5555.
TVs that only offer Wireless debugging (step 1) come in two kinds: With a pairing-code entry (Sony BRAVIA on Android 14 and similar): pair first as in step 1, then run adb tcpip 5555 once connected, so the first line of the commands is 5555; without that, use the IP:port from the main Wireless debugging screen on the first line. Without a pairing-code entry (TCL Q10M, Q10L, Crane 6 Ultra and similar): follow the by-brand guide (Chinese) and connect the TV to a computer with a USB cable, then run adb tcpip 5555 once authorized; until you do, the first line's :5555 will not connect.
Without a computer, use an ADB app on a phone: 甲壳虫 ADB 助手 (Beetle ADB), 超级小爱 (Super Xiaoai), or similar tools from the app store.
Phone and TV on the same Wi-Fi.
Turn on ADB on the TV as in step 1 above; the IP address is in the same place.
Connect the phone to <TV-IP>:5555; choose Always allow on the TV.
Install PlanYourTV from the app (standard build; try the guard build if that is refused), then grant permissions one by one as in Windows item 3 of the install guide and start the app as in item 6.
Users have installed PlanYourTV this way; we have not tested each tool. Phone tools usually can't finish every setting, so once it's installed, run the check with a computer or an agent if you can.
No computer, and no need for steps 1 and 2 above: copy the APK to a USB drive, plug it into the TV, and open it with the TV's file manager to install.
planyourtv-guard.apk: use this if the first is refused because the TV won't install home-screen apps.
planyourtv-lite.apk: PlanYourTV Lite (a beta) for old TVs and boxes on Android 4.0-4.4. The Agent and One command tabs pick Lite on their own, never the wrong one.
Once it's installed, press Home on the remote. If Android asks which app to use, choose PlanYourTV, then Always, and you're done; stock Android TV usually works this way.
If Home goes straight back to the old home screen without asking (most Chinese-brand TVs): open PlanYourTV from the app list. It shows "Make PlanYourTV Your Home Screen", whose entries open the TV's settings for the home guard (Accessibility) and notification access. If the TV's settings don't have them, PlanYourTV works only as an ordinary app opened from the app list; to take over Home, set it up once with a computer or an agent (it installs over, settings stay).
Whether Home, power-on and wake come back to PlanYourTV after a USB-only install depends on those entries being in the TV's settings; a computer install is the most reliable. Later updates: choose "New version" in Control Center, or install from the USB drive again.
PlanYourTV Lite looks the same as the full app but has no Home Guard: once it's installed, press Home and choose PlanYourTV Lite, then Always; where the firmware keeps Home for its own launcher, open Lite from the app list. No aerial wallpaper, input tiles or in-app updates either (updating is installing again). To undo: Settings → Apps → PlanYourTV Lite → Clear defaults, or uninstall it. Report problems with the device support form, with Lite in the title.
When the TV asks to allow debugging, choose Always allow. On TCL, accept the 多屏互动 (screen sharing) prompt with 同意 (Agree).
Installed, but something is off?
Home goes back to the old launcher, standby or a restart ends there, an input opens the wrong port, the brightness slider does nothing: adapt PlanYourTV to your TV one of these ways and send it in, so the next owner of the same model does not have to.
1Hand it to an agent (easiest)
Paste this into an agent that can run commands on your computer. It tests the TV, fixes on the spot what it can, and writes a report for you to read before it is posted. The TV address is the one from step 2 above.
2Send it in from your phone
Control Center → Personalize, scan the QR code, and at the bottom of the phone page choose Report a Problem → Show Diagnostics → Report on GitHub: the model and the version fill the form, and the diagnostics are copied for you to paste.
On a computer: curl -fsSL https://raw.githubusercontent.com/planyourtv/planyourtv/main/tools/report.sh | TV=<tv-ip> bash (reads only) and curl -fsSL https://raw.githubusercontent.com/planyourtv/planyourtv/main/tools/selftest.sh | TV=<tv-ip> bash (presses Home and checks PlanYourTV comes back), then paste both into the device support form. The diagnostics hold no accounts, addresses, Wi-Fi names or app lists.
FAQ
Can I install it straight from a web page?
No. Browsers can't reach the TV's ADB. The agent prompt or the one-line command is the easiest way.
Can it break my TV? How do I undo it?
No. PlanYourTV doesn't touch system apps; it grants itself a few permissions and changes the home screen and screensaver settings, and all of that can be undone. The easiest way is to paste the text below into an AI that can run commands on a computer (the same kind you installed with): it follows the Undo section of the install guide, undoes every change and leaves the TV on its original home screen. Add "and uninstall PlanYourTV as well" to also remove it.
By hand: replace the final bash in the one-line command with bash -s restore, that is curl -fsSL https://raw.githubusercontent.com/planyourtv/planyourtv/main/tools/get.sh | TV=<TV-IP> bash -s restore; add --uninstall to remove PlanYourTV too. On Windows without bash, the commands one by one are in the install guide.
My firmware won't install home-screen apps?
Install the build that doesn't declare itself a home screen: add -s guard to the end of the one-line command, or download planyourtv-guard.apk for a manual install.
Do my subscriptions, Xiaoai, Xiaomi account or cable TV change?
No. PlanYourTV only replaces the home screen: Xiaomi / TCL subscriptions, Xiaoai, your Xiaomi account and cable TV all work as before, and the old home screen still opens from the app list.
Where did Xiaomi Video and PatchWall content go?
The 桌面 (Home) tile opens PatchWall as before, with its recommendations and subscription content. The boot ad comes from the firmware; PlanYourTV can't remove it.
The agent says it's installed, but nothing changed on the TV?
Some agents report success without running anything. Ask it to paste the raw output from "Check" in the install guide: which home screen resolve-activity finds, whether enabled_accessibility_services contains com.planyourtv.tv, and the mCurrentFocus after pressing Home. The install only worked if the last one includes com.planyourtv.tv.
Can I install it with only a phone?
You can try. Users have installed PlanYourTV with Beetle ADB (甲壳虫 ADB 助手) and Super Xiaoai (超级小爱) on a phone; we haven't tested each one. See "Phone only" under Install.
How do I update?
From 1.32, the TV's Control Center shows New Version when there is one: choose Download and Install, then confirm in the TV's own installer. On TVs that do not let apps install apps, updating means running the install command again (or asking the agent again); the update page has a QR code that opens this TV's command on a phone. Settings, layout and wallpaper are kept.
What permissions does it use?
WRITE_SECURE_SETTINGS turns Home Guard back on if it's switched off. The notification listener lets Android restart PlanYourTV; it reads no notifications. Accessibility only sees which window is in front, not what's on screen. Location only shows your Wi-Fi name.
Where do the aerial films come from? How much data do they use?
They stream straight from Apple's servers in 1080p, at about 15–20 Mbps. If they can't load, PlanYourTV switches to the photo screensaver.
Will it work on my TV?
Check the list. If yours isn't there, probably. Stock Android TV and Google TV are the easiest. LG webOS, Samsung Tizen and Huawei Vision (HarmonyOS) run different systems and can't take PlanYourTV; Android 4.0-4.4 TVs get PlanYourTV Lite (a beta, see USB drive under Install; the agent and the one-line command install it on their own); older ones are not supported. Some TVs can't open ADB at all, such as old LeTV sets, Honor Vision and old Konka models (no version number to tap). Slow or low-memory TVs pick Lite effects on their own; you can also choose it in Personalize → Effects. If something goes wrong, see Installed, but something is off? above.
 <<<<<<< HEAD


 Claude Code
 Codex
 Cursor
 WorkBuddy
 Trae